Putting together a gaming pc can feel confusing, but it does not have to be. In this guide, I walk you step by step through parts, planning, assembly, and setup so you can build a fast and reliable gaming rig with confidence.
Understanding what putting together a gaming pc really means
When I talk about building a gaming PC, I mean more than just snapping parts into place. I mean planning a system that fits your games, your budget, and your future upgrades.
When you plan first, you avoid bottlenecks, wasted money, and random crashes. You also end up with a gaming computer that feels smooth and stays useful longer.
Setting your goals before putting together a gaming pc
Before you start building a gaming PC, you need clear goals. This helps you pick the right parts instead of chasing every new trend.
Ask yourself a few simple questions:
Which games do I play most?
What resolution is my monitor, such as 1080p or 1440p?
How much can I spend on the full build?
Do I plan to upgrade later?
When I help people with gaming PC help in Knoxville TN, I always start with these questions. Clear goals make every later choice easier and less stressful.
Choosing a budget for putting together a gaming pc
Your budget sets the limits for your gaming PC build, so it should be realistic. If your budget is too low, you may end up with parts that feel outdated very quickly.
You do not need the most expensive parts to enjoy smooth gaming. You just need a balanced system where the main parts match each other in speed and quality.
Common budget ranges for putting together a gaming pc
Here is a simple way to think about budgets when you plan a gaming computer:
Entry level: Great for eSports titles and lighter games.
Mid range: Good for modern AAA games at 1080p or 1440p.
High end: Best for very high frame rates or 4K gaming.
If you are not sure where your budget should land, you can start with a mid range target and adjust as you pick parts. This keeps your expectations grounded and your choices more focused.
Key parts you need when putting together a gaming pc
A strong gaming PC always uses the same main parts. When each part is chosen well, the whole system feels smooth and responsive.
The main parts you need are:
CPU or processor
Motherboard
RAM or memory
Graphics card or GPU
Storage, such as SSDs
Power supply or PSU
Case
Cooling, including CPU fans and sometimes case fans
In the next sections, I walk through each of these so you know what to look for when you plan your gaming build.
Picking the right CPU for putting together a gaming pc
The CPU is the brain of your system, and it matters a lot in a gaming PC. A weak processor can hold back a strong graphics card and lower your frame rates.
You should look for a modern mid range or better CPU with several cores and high clock speeds. This gives your games room to breathe and keeps your system ready for new titles.
I like to match the CPU tier with the GPU tier. If one part is far cheaper or weaker than the other, you get a bottleneck where performance is wasted.
Picking the right GPU
The graphics card, or GPU, is usually the most important part for gaming. It has the biggest impact on how your games look and feel.
Always match your GPU to your monitor resolution and refresh rate. For example, 1080p at 60 Hz needs less power than 1440p at 144 Hz.
If you focus on eSports titles, you can often choose a slightly cheaper GPU and still enjoy high frame rates. For heavy AAA games with lots of detail, you should plan for a stronger graphics card.
Picking the right GPU for putting together a gaming pc
The graphics card, or GPU, is usually the most important part for gaming. When you are putting together a gaming pc, the GPU has the biggest impact on how your games look and feel.
Always match your GPU to your monitor resolution and refresh rate. For example, 1080p at 60 Hz needs less power than 1440p at 144 Hz.
If you focus on eSports titles, you can often choose a slightly cheaper GPU and still enjoy high frame rates. For heavy AAA games with lots of detail, you should plan for a stronger GPU when putting together a gaming pc.
Choosing RAM and storage when putting together a gaming pc
RAM and storage do not get as much attention, but they matter for smooth gaming. When putting together a gaming pc, I always plan enough memory and fast storage from the start.
For RAM, aim for enough capacity and decent speed. Many modern games benefit from that extra headroom, especially when you run a browser or chat tools in the background.
For storage, a solid-state drive or SSD is almost a must when putting together a gaming pc. Games load faster, the system feels snappier, and updates do not drag on as much.
Selecting a motherboard when putting together a gaming pc
The motherboard is like the backbone of your system. When putting together a gaming pc, it connects every part and controls how they talk to each other.
You do not always need the most expensive motherboard, but you do need one that supports your CPU, RAM speed, and future upgrades. You also want enough USB ports and slots for your needs.
If you think you may upgrade your CPU or RAM later, choose a board that supports higher end parts. This way, putting together a gaming pc now also sets you up for easy upgrades later.
Picking a power supply for putting together a gaming pc
The power supply, or PSU, is often ignored, but it is key for stability and safety. When putting together a gaming pc, a poor power supply can cause random shutdowns or even damage.
You should choose a PSU from a trusted brand with enough wattage for your parts. A little extra headroom helps handle power spikes during heavy gaming.
If your budget allows, look for higher efficiency ratings. Over time, this can help reduce wasted energy and heat when putting together a gaming pc for everyday use.
Choosing a case and cooling for putting together a gaming pc
The case and cooling system affect both looks and temperatures. When you are putting together a gaming pc, you should think about airflow, noise, and future upgrades.
A good case has room for your parts, has clear airflow paths, and supports enough fans. This keeps your CPU and GPU cooler and more stable during long gaming sessions.
Airflow should move from front to back and from bottom to top when putting together a gaming pc. With this simple pattern, you avoid hot spots and dust buildup.
Tools you need before putting together a gaming pc
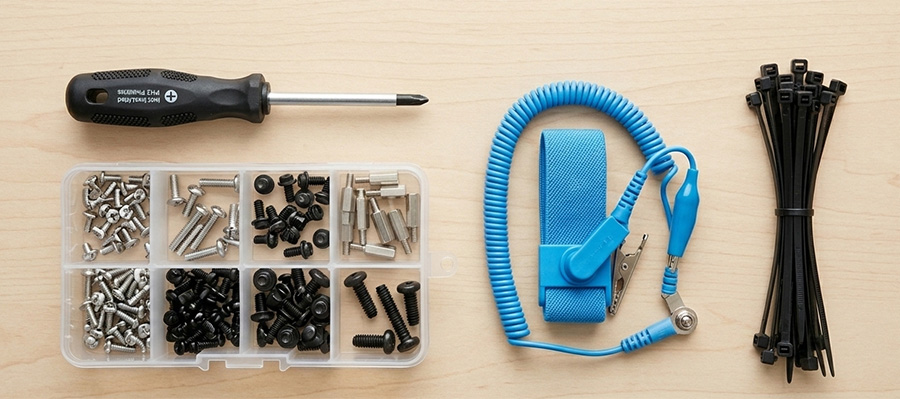
Before you start putting together a gaming pc, gather a few simple tools. Having them ready makes the process smoother and less stressful.
You will usually need:
A good Phillips screwdriver
A clean table or desk
A small dish or tray for screws
Access to your phone or a device to look up manuals
It also helps to work in a room with good lighting. When putting together a gaming pc, seeing small labels and ports clearly makes a big difference.
Preparing your workspace for putting together a gaming pc
Your workspace matters more than most people think. When putting together a gaming pc, a clean and static safe area lowers the risk of damage.
You should avoid working on thick carpet if possible. A simple desk or table with a hard surface works well and gives you room to spread out your parts.
Before putting together a gaming pc, wash and dry your hands. If you have an anti static wrist strap, you can use it, but you can also touch a metal part of the case often to stay grounded.
Step by step: putting together a gaming pc

Now that you know the parts and tools, we can walk through the actual build. Putting together a gaming pc is easier when you follow a simple order.
Step 1: Installing the CPU and RAM
I like to start with the motherboard on a flat box. This gives you a soft but stable surface when putting together a gaming pc.
Open the CPU socket, line up the small mark on the CPU, and place it gently. Do not force it. Then close the latch.
Next, open the RAM slots and click the memory sticks into place until you hear a solid click. When putting together a gaming pc, you should always use the slots recommended in the manual for dual channel.
Step 2: Adding the CPU cooler
If your CPU came with a cooler, the manual will show how to mount it. When putting together a gaming pc, make sure you remove any plastic cover and line up the screws.
If thermal paste is not pre-applied, use a small pea sized drop in the center of the CPU. When you tighten the cooler, it spreads out across the surface.
A secure cooler is important for safe temperatures when putting together a gaming pc. You should also plug the cooler fan into the correct CPU fan header on the motherboard.
Step 3: Mounting the motherboard in the case
Now you can move the motherboard into the case. When putting together a gaming pc, always check that the standoffs match the holes in your board.
Place the board gently inside and line up the ports with the back panel. Then add the screws one by one, snug but not overly tight.
This step can feel tricky the first time you are putting together a gaming pc. Taking your time here helps avoid slips and scratches.
Step 4: Installing storage drives
Next, install your SSD or hard drive in the case. Many cases have simple trays or brackets to hold drives in place when putting together a gaming pc.
Connect the data cable from the drive to the motherboard and the power cable from the power supply. Make sure each connection clicks in firmly.
If you use an M.2 SSD, it often mounts directly to the motherboard. This keeps things neat and tidy when putting together a gaming pc.
Step 5: Installing the power supply
Slide the power supply into its spot in the case, usually at the bottom rear. When putting together a gaming pc, you should check that the fan faces an open vent.
Secure the PSU with the screws that came with it. Then start routing the main cables, such as the 24 pin motherboard cable and CPU power cable.
Clean cable routing does not just look nice. It also improves airflow and makes future work easier when putting together a gaming pc.
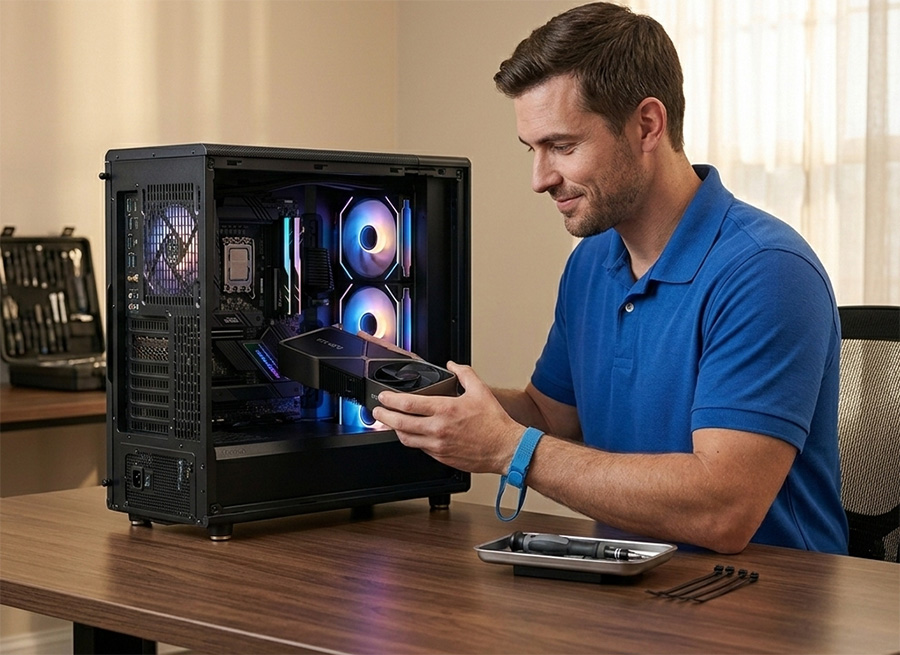
Step 6: Installing the graphics card
Now you can add the graphics card, which is often the most exciting part when putting together a gaming pc. Remove the correct rear slot covers from the case first.
Slide the card into the top PCIe slot until it clicks, then secure it with screws at the back. Connect the PCIe power cables from the PSU if your card needs them.
When putting together a gaming pc, make sure the GPU sits level and does not sag. Some cases include brackets to help support longer cards.
Step 7: Connecting case cables and fans
At this point, you connect the smaller cables. When putting together a gaming pc, these front panel cables can feel like the most detailed part.
You need to plug in:
Power and reset button cables
USB cables from the case
Audio cable for the front ports
Case fans to the motherboard or a fan hub
Using the motherboard manual as a guide helps you avoid confusion. While putting together a gaming pc, do not rush this step, because loose cables can stop your system from turning on.
First startup after putting together a gaming pc
Once all parts and cables are in place, you are ready for the first power on. This is a big moment when putting together a gaming pc.
Before you press the power button, check for any loose screws, unplugged cables, or tools left in the case. Then connect your monitor, keyboard, and mouse.
If everything is set up well, you should see the system turn on and show the motherboard logo. When putting together a gaming pc, this first boot confirms that your core parts work.
Setting up BIOS and installing an operating system

After your first boot, you can enter the BIOS by pressing the key shown on screen. This is where you check that your CPU, RAM, and drives are detected when putting together a gaming pc.
You can also set your boot order so the system looks at your USB drive first. Then you can install your operating system step by step.
Once the OS is installed, you should add your motherboard drivers and graphics card drivers. These help your games run smoothly after putting together a gaming pc.
Testing and optimizing after putting together a gaming pc
Now that your system is running, it is smart to test it. When putting together a gaming pc, testing helps you catch small issues early.
You can:
Run a basic CPU and GPU stress test
Monitor temperatures while gaming
Check that all fans spin and stay quiet enough
If something feels off, you can adjust fan curves or move cables. Small tweaks like these can improve your comfort and performance after putting together a gaming pc.
Common mistakes to avoid when putting together a gaming pc
Even careful builders make mistakes, especially on their first build. Knowing the common mistakes helps you avoid them when putting together a gaming pc.
Some common issues include:
Forgetting motherboard standoffs
Not plugging in all power cables
Forcing parts that do not line up
Skipping the step of reading manuals
Ensuring you are using the correct RAM – read all motherboard specs before buying
- Ensuring the SSD hard drive is favorable for your motherboard – some boards only work well with certain brand SSD’s
If your system does not turn on after putting together a gaming pc, do not panic. Often, the fix is a simple loose cable or missed connector.
When to get gaming PC help in Knoxville TN
If you feel stuck, you do not have to do everything alone. When putting together a gaming pc turns from fun to stressful, it may be time for local support.
Because I work with computers and gaming systems, I understand how small details can break a build. With gaming PC help in Knoxville TN, you can get guidance, troubleshooting, or full build support tailored to your parts and budget.
If you live in the area and want expert help putting together a gaming pc, you can reach out for personal support. I can help you plan your parts, check compatibility, or recover a build that refuses to start.
For direct help or repair, you can use my online form at Request Computer Repair Service. Whether you need advice, a build review, or full hands on help putting together a gaming pc, I am ready to help you get the gaming setup you want.
Need Repair? Let’s Get It Fixed Today
Ready to Fix Your Computer Problem? Schedule Service Today!!